ChronoScope User Manual
Welcome to ChronoScope, the visual conductor designed by and for composers. This tool allows you to overlay a fully customizable visual conductor on your video, perfectly synchronized with your DAW through MIDI files.
This manual will guide you through all the features of ChronoScope, from the initial setup of your project to the final export.
1. Introduction: What is ChronoScope?
ChronoScope solves a fundamental problem in composition for film and audiovisual media: the need for a precise visual and auditory reference that adapts to the musical structure of your cues.
Instead of relying on a simple metronome or a pre-printed click track video, ChronoScope reads the structure of your MIDI files (time signatures, tempo, and custom markers) to generate a layer of visual information in real-time over your video. This includes:
- Streamers (wipes) to signal time signature changes, custom markers, or the end of a piece.
- Punches (circular flashes) to accentuate key moments.
- Measure and beat counters.
- Dynamic cue titles.
- A low-latency audible metronome that respects complex subdivisions and rhythmic patterns.
The entire system is driven by a high-precision master clock that ensures perfect synchronization between audio, video, and overlays.
2. Getting Started: Project Setup
The main window is your operations center. From here, you will manage your projects.
A ChronoScope project consists of two main elements:
- Project Directory: A folder containing all the MIDI files (`.mid`) corresponding to the cues for your film or episode.
- Video File: The reference video you will be composing to.
Steps to Begin:
- Select Project Directory: Click `Select Project Directory` and choose the folder containing your MIDI files. ChronoScope will automatically analyze these files in the background.
- Select Video File: Click `Select Video File` and choose the video you will be working with. ChronoScope will process the video's audio to create a cache, allowing for instant playback and seeking.
Once both elements have been loaded and analyzed, the `Launch Player` and `Export Video` buttons will become active.
3. The Sequence Editor
The heart of ChronoScope lies in its integrated sequence editor. This powerful tool allows you to organize your cues, edit their properties, and, most importantly, embed visual markers directly into the MIDI files.
The editor is divided into three main panels:
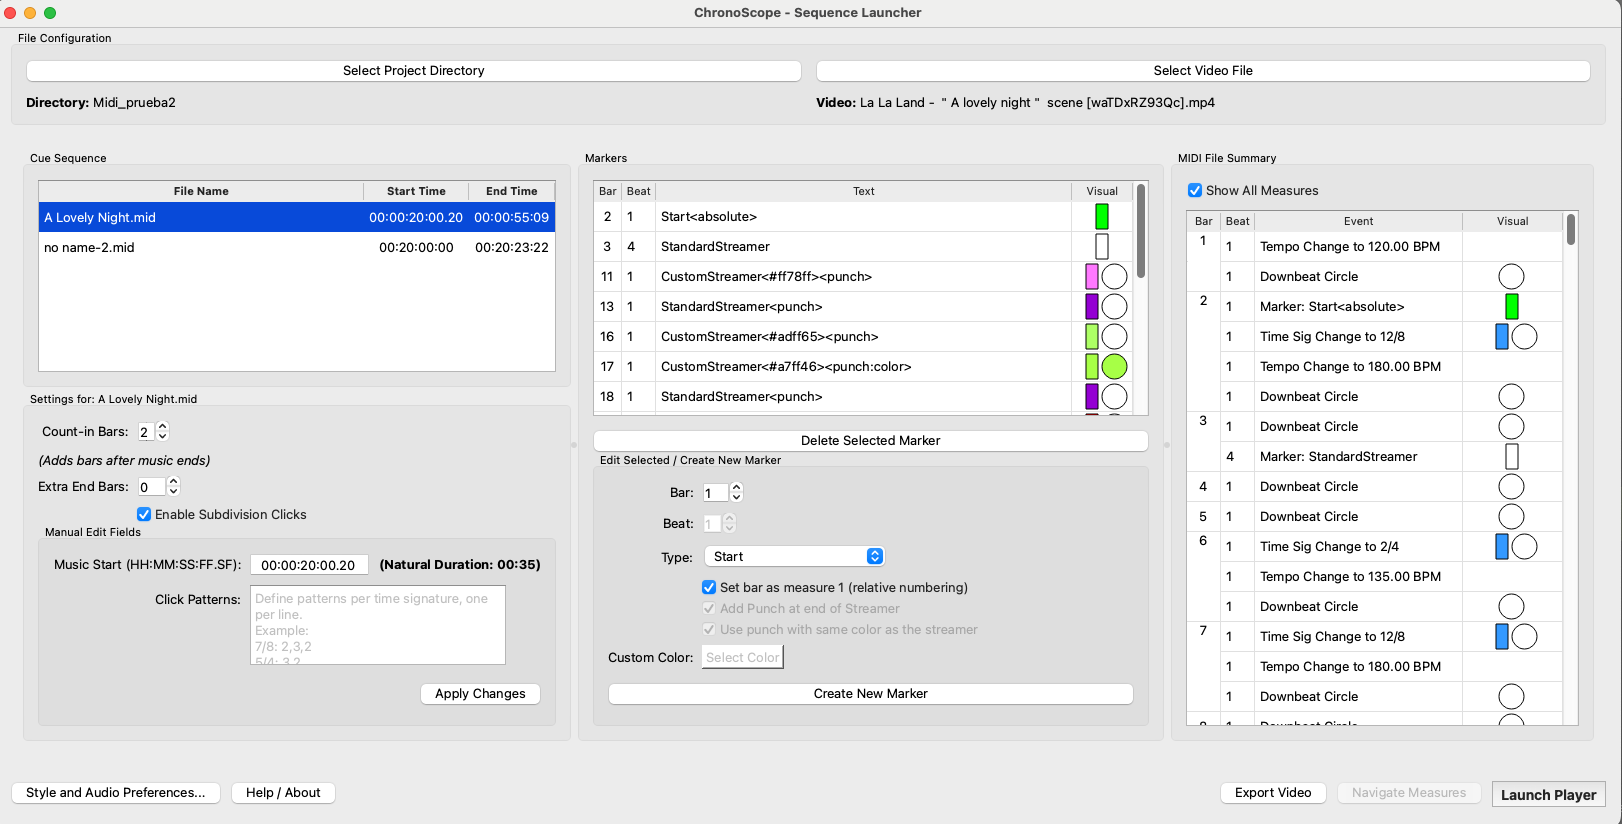
3.1. Left Panel: Sequence and Cue Settings
This panel displays the list of all cues (MIDI files) in your project and allows you to edit the settings for the selected cue.
Cue List
The top table shows all MIDI files found in your directory. The columns are:
- File Name: The name of the MIDI file.
- Music Start: The start time of the cue in SMPTE format (`HH:MM:SS:FF.sf`). This is the exact point in the video timeline where the music will begin to play.
- End Time: The calculated end time of the cue, considering its natural duration and any extra bars added.
The list is automatically sorted by start time. If a cue overlaps with the previous one, it will be marked in red and disabled in the player to avoid conflicts.
Cue Settings
When you select a cue, you can configure its properties:
- Count-in Bars: The number of count-in (pre-roll) bars that will sound before the cue begins.
- Extra End Bars: Adds silent bars at the end of a cue. This is useful for creating a buffer before the next cue starts.
- Enable Subdivision Clicks: If checked, the audible metronome will also play the beat subdivisions (e.g., eighth notes in a 6/8 time signature), not just the main pulses.
- Music Start (HH:MM:SS:FF.SF): A text field to manually adjust the cue's start time. It supports up to 80 subframes for extreme precision.
- Click Patterns: Allows you to define custom rhythmic patterns for the metronome in complex or asymmetrical meters. For example, for a 7/8 time signature, you can write
7/8: 2,3,2
to have the metronome accent the beats according to that grouping.
3.2. Center Panel: Marker Editor
This is ChronoScope's star feature. It allows you to embed visual events directly into your MIDI files. Select a cue from the list to activate this panel.
How do markers work?
ChronoScope reads standard "Markers" from a MIDI file. The text of each marker is interpreted to generate a visual event.
Marker Types:
- Start: Defines the exact point where the music "begins" within the MIDI file. Everything before it will be ignored. You can make it "relative" (the marker's measure becomes 1/1) or "absolute" (maintains the original numbering).
- End: Truncates the cue at that exact point. Useful for abrupt endings or for cutting sections from a longer MIDI.
- Standard Streamer: A white wipe that signals an event. By default, it ends with a "punch" (circular flash).
- Standard Punch: A white circular flash.
- Custom Color Streamer: A streamer with a custom color. Ideal for differentiating event types (e.g., blue streamers for time signature changes, yellow for warnings).
- Custom Punch: A punch with a custom color.
Editing Controls:
- Bar / Beat: The musical position (measure and beat) where the marker will be inserted.
- Type: The type of visual event you want to create.
- Add Punch at end of Streamer: Whether the streamer should end with a flash.
- Use punch with same color...: Whether the punch of a colored streamer should inherit the color or be white.
- Select Color: Choose the color for "Custom" markers.
3.3. Right Panel: MIDI Visual Summary
This panel offers a preview of all events (musical and visual) that will occur in the selected cue, measure by measure. It is an invaluable tool for verifying that your markers, tempo changes, and time signature changes are placed correctly.
- Events Shown: Tempo changes, time signature changes, custom markers, and downbeat circles.
- "Show All Measures" Filter: By default, it shows all measures. If you uncheck it, it will only show measures that contain an event, facilitating a quick review.
4. The Real-Time Player
By pressing `Launch Player`, ChronoScope opens a new window that plays your video with all the visual overlays and the audible metronome in real-time.
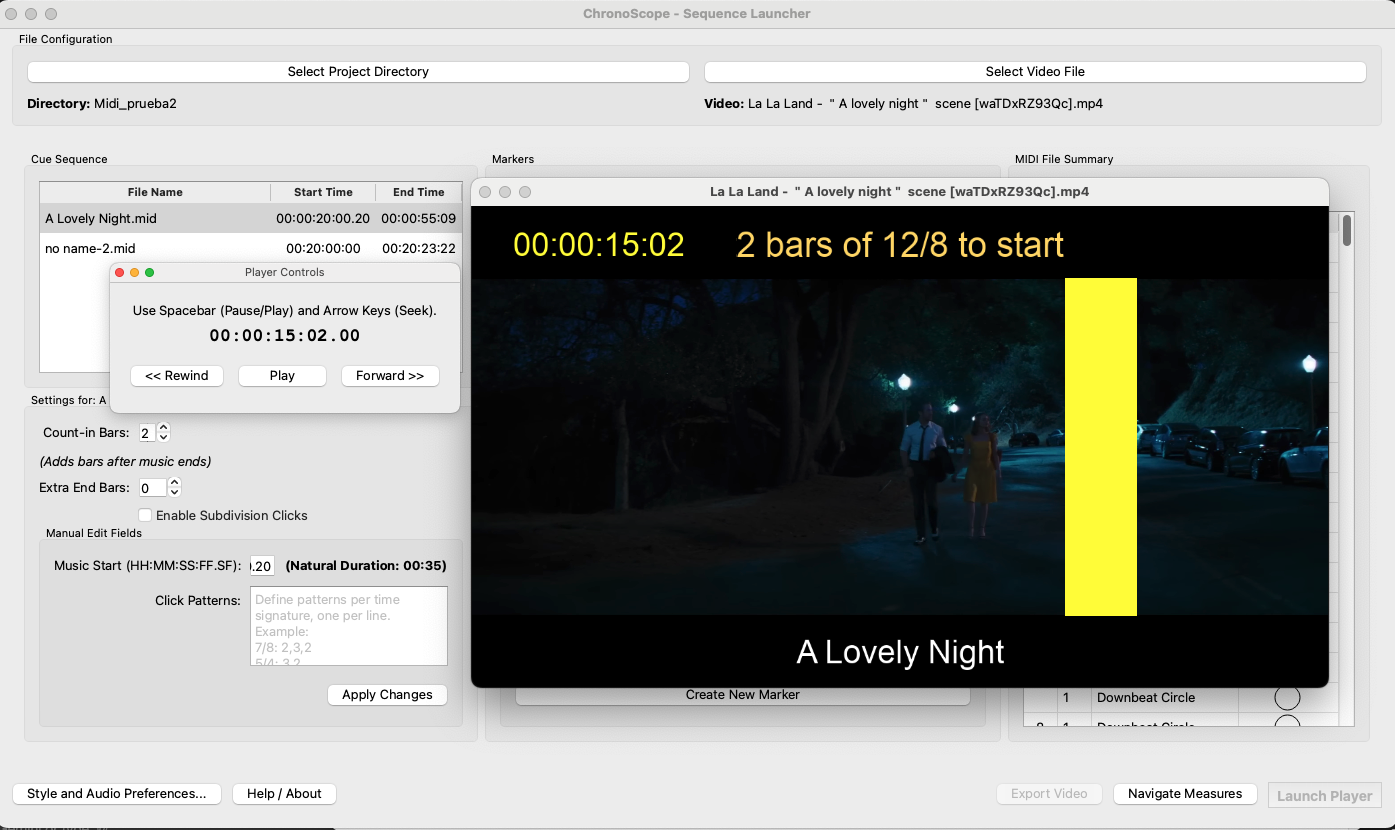
Example of the Player with Pre-roll active
4.1. Player Controls
A small control window allows you to:
- Pause/Resume playback.
- Seek Forward/Backward in 10-second intervals.
- View the current SMPTE time.
To seek forward/backward it's NECESSARY to pause the video first and then do the seek.
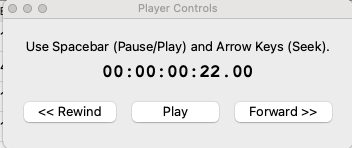
Player controller window
4.2. Measure Navigator
While the player is running, you can open the `Measure Navigator`. This window displays a list of all works and their measures. Double-click on any measure to instantly jump to that point in the video.
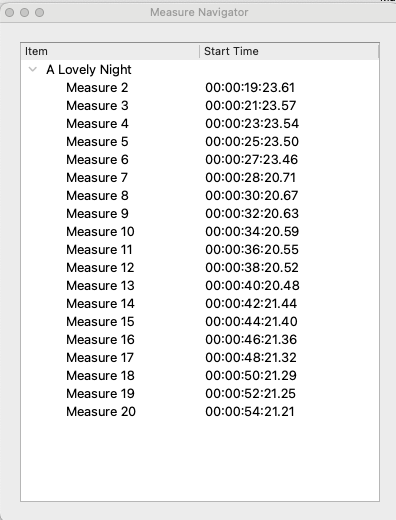
Measure Navigator window
5. Visual Overlays: The Virtual Conductor
ChronoScope offers a complete set of overlays, each with a specific purpose. All are customizable from the Preferences window.
- Titles (Current/Next Work): Shows the title of the current cue and a countdown to the next one.
- Pre-roll System: An intelligent system that activates before each cue.
- `Pre-roll Warning (Yellow Bar)`: A yellow bar warns of the upcoming count-in.
- `Pre-roll Count-in (Green Bar)`: A green bar swipes during the musical count-in.
- `Pre-roll Counter`: A numeric "Bar | Beat" counter during the pre-roll.
- SMPTE Timecode: A master `HH:MM:SS:FF.sf` clock that serves as an absolute reference.
- Measure/Beat Counter: The main "Bar | Beat" counter during cue playback.
- Beat Circle (on downbeat): A white circular flash on the first beat of each measure.
- Time Signature Change (Blue): A blue wipe that warns of an impending time signature change.
- Marker Warning (Purple/White): Streamers and punches generated by the markers you have embedded in your MIDIs.
- Exit Bar (Red): A red wipe that indicates the end of a cue, triggered by an `End` marker.
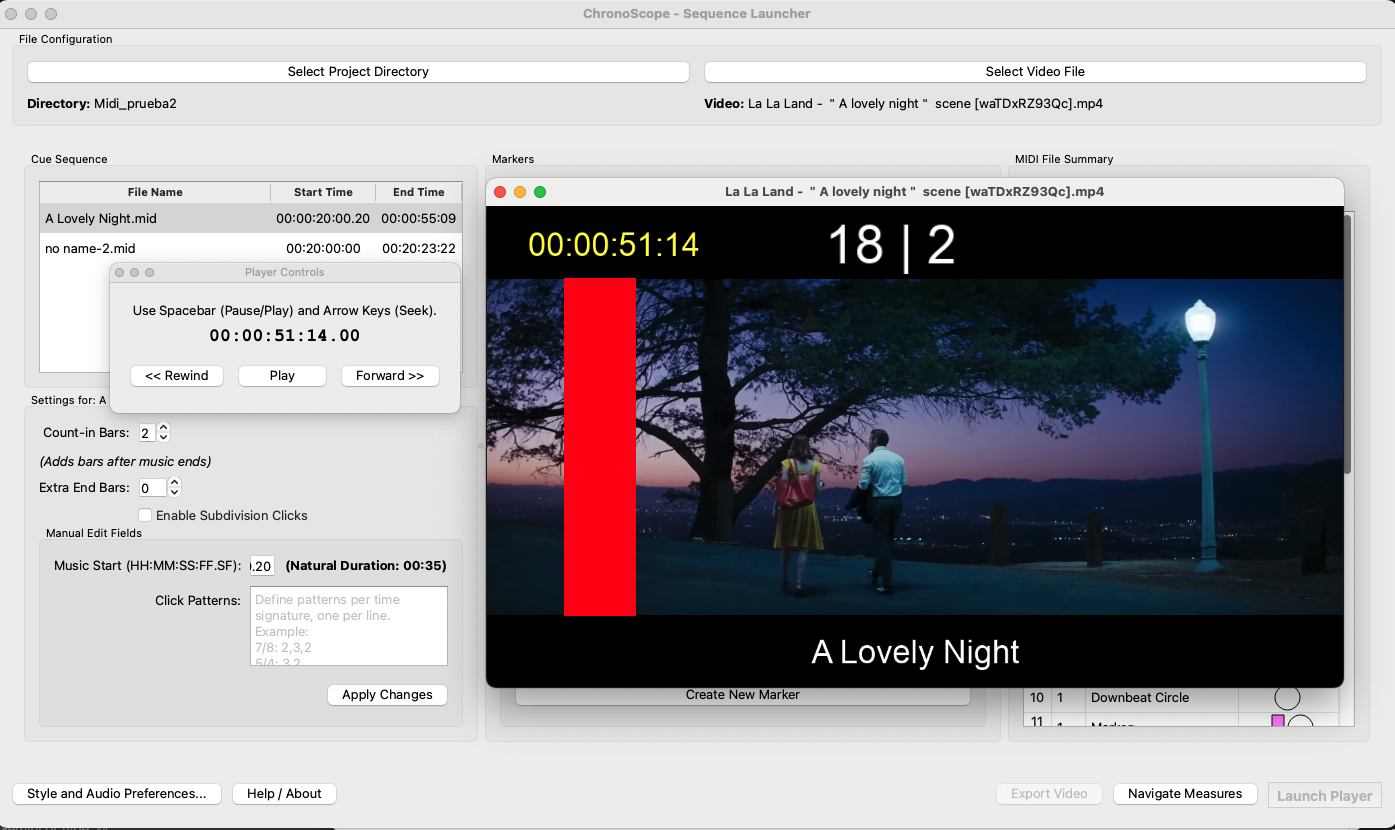
Player with Exit streamer activated
6. The Preferences Window
Accessible via the `Style and Audio Preferences` button, this window gives you full control over the look and sound of ChronoScope.

Style and Audio Preferences window
Tabs and Options:
- Overlay Visibility: Enable or disable each overlay individually.
- Audio: Adjust the volume of the audible metronome and the original video audio. You can also decide if the original audio will be included in the final export.
- Streamer Animation Style: Control the duration, width, and height of all wipes (streamers).
- Individual Styles: For each text overlay (Title, Counter, SMPTE), you can adjust:
- Scale: The size of the text.
- Position X/Y: The position on the screen.
- Color: The color of the text.
- Timecode Origin Mapping: One of the most powerful features. It allows you to map a video time to a different display time. For example, you can make the time `00:00:10:00` in your video display as `01:00:00:00` in the SMPTE overlay. ChronoScope will calculate the offset and adjust all your cue start times automatically.
7. Exporting the Video
When your sequence is ready, you can export a new video file with all the visual overlays and audio (metronome and/or original audio) "burned" into it.
- Click `Export Video`.
- A dialog will open where you can choose:
- Export Quality: `Draft` (fast, low quality), `Medium` (recommended), or `High` (slow, best quality).
- Output File: The path and name of the final video file.
- The export process is performed in two phases and is shown in a progress bar:
- Phase 1: Rendering the video frames with the overlays.
- Phase 2: Mixing the audio tracks (original audio and generated metronome) and final compression.
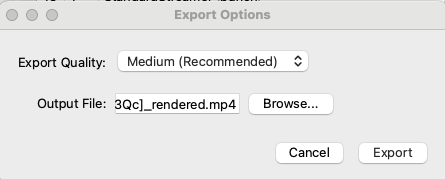
Export video window
8. Advanced Concepts and Project Files
This section summarizes the key concepts and project files:
- cues.json: This is the central file of your project, saved in the directory you selected. It stores the sequence of cues, their start times, and all preference settings. It is a readable text file that you can edit manually if necessary.
- MIDI Interpreter: This is the "brain" that reads a MIDI file and extracts all its musical information: tempo, time signature changes, duration, and, crucially, the text markers. It creates an internal representation for each file, which is then used throughout the application.
- Audio Metronome: Generates the metronome click tones using a low-latency audio library. It is capable of playing different tones for strong, weak, pre-roll, and subdivision beats.